8 steps to take amazing backlight travel photos
One of the basic rules in photography is that the sun should be behind the photographer. However, really good pictures often come about when you break the rules. Taking pictures against the light or with light from the side can result in brilliant pictures. Because when the light falls on the lens from the front, you get particularly high-contrast images and the image has a great dynamic. There are no limits to your creativity.

Ideas for particularly suitable motifs in the backlight
In both landscape and wildlife photography, fantastic photos can be captured against the light:
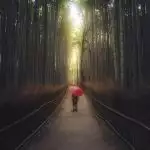
- Silhouettes in the landscape or an animal
- Catch the sun with sun rays (star effect)
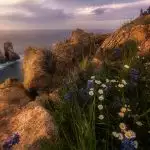
- Fibers and patterns from plants, flowers and grasses
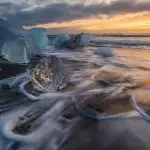
- Pearling drops of water
- Dust or smoke in the air
- Landscapes that are partly covered in fog
- Forests with great moods and refractions
The basics to shoot against light
Use the best time for backlight shots
As with other types of photography, the golden hour is in the early morning & the last lights before sunset is the best time to capture backlit shots. When the sun is low in the sky, the light is particularly warm and gives the photos a beautiful atmosphere and dynamism.
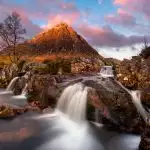
Use the light to create depth of field, like in this example at the Snaefellsnes Peninsula in Iceland.

Avoid lens flare in your recordings
A challenge when photographing against the light is unwanted reflections on the picture, so-called lens flares. It is often not easy to avoid them. Be sure to use a sun visor on the lens. Sometimes it also helps to cover the incident light with a free hand or another object. Check the result on your display.
Don’t be confused with other effects of the sun, such as the halo that is generated around the sun in certain circumstances.

Position the light source optimally in your composition
Depending on how you position your subject in the composition, you will get different results. In wildlife photography, for example, you can achieve great effects if your subject is illuminated by the sun or light directly from behind. The outline of your subject is then nicely lit. In landscape photography, it is worthwhile to either let the sun fall obliquely into the picture. Either so that the sun itself is not part of the picture or consciously place it in the picture, for example with a star effect.

Choose the right settings on your camera
- Manual setting: For backlit shots, you should either use the automatic aperture and shutter priority or, even better, the manual camera settings.
- ISO: The ISO value should be as low as possible. In landscape photography, you can often shoot at ISO 100 with a tripod. In wildlife photography, you should keep an eye on your exposure time and adjust ISO accordingly.
- Aperture: You choose the aperture depending on the depth of field you want to achieve in the subject. When shooting wildlife, it is often worthwhile to work with an open aperture in order to free the subject from the background and to achieve a nice bokeh. In landscape photography, on the other hand, you often want to achieve a high depth of field and should therefore use an aperture value of f8 and higher.
- Shutter speed: It is also important to consider the effect you want to achieve with the shutter speed. In wildlife photography, for example, you should make sure that the shutter speed is fast enough to focus on the moving animal. In landscape photography, you can also use slower shutter speeds when working with a tripod.
- Exposure metering: In wildlife photography, you can use spot metering to better measure the individual light values of your photo subject and determine which part of your composition should be exposed accordingly.
- Useful helpers: Make sure to use a tripod for backlit photos in landscape photography and use gray graduated filters or gray filters if necessary. These help to balance out the high contrast range of the foreground and background. The following applies to both wildlife and landscape photography: it is essential to use a lens hood!

Practice tips
Backlit photography takes some practice. So that you can quickly capture good pictures, we recommend that you observe the following tips for the camera settings:
8 easy steps to take landscape photos
- Set your camera to aperture priority (Nikon: A / Canon: AV) or to M for manual setting .
- Set your camera to single autofocus (Nikon: AF-S / Canon: One-Shot) or focus manually .
- Choose your desired aperture (e.g. f8 and higher).
- Do you want to create a silhouette effect? Then expose the light areas of your subject.
- If necessary, make an exposure bracketing , for example:
a) +1 or higher to make the image lighter
b) -1 or less to make the image darker
c) and / or correct the ISO value - Would you like to represent the sun with rays and create a star effect? Then choose the smallest possible aperture between f11 and f22. The smaller the aperture, the finer and longer the rays become.
- Use a gray graduated filter depending on the photo subject. This helps to create a correctly exposed photo despite the high contrast range.
- Check the histogram to make sure the images are correctly exposed.

8 easy steps to taking wildlife photos
- Set your camera to aperture priority mode (Nikon: A / Canon: AV)
- Use continuous autofocus (Nikon AF-C / Canon AI-Servo) and work with only one focus area if possible.
- Open the aperture as much as possible; choose the smallest possible f-number, for example f/4.0
- Try alternating spot metering or center-weighted metering
- If necessary, make an exposure bracketing, for example:
a) +1 or higher to make the image lighter
b) -1 or less to make the image darker
c) and / or correct the ISO value - Do you want to create a silhouette effect? Then expose the light areas of your subject. In the case of silhouette photos, make sure that your subject is free as a silhouette and is not broken by other things (e.g. animals or plants).
- If possible, position your subject in front of a dark background . This lets your motif come into its own even better.
- Check the histogram to make sure the images are correctly exposed
With a little routine, you can adjust the camera settings in manual mode.