Complete guide to photographNorthern Lights
Ultimate complete Photography Guide to Photograph Northern Lights
Looking to photograph Northern Lights? For most photographers, capturing this phenomenon with your camera (or phone) is one of the most amazing experiences. An expedition to the Arctic Circle looking for Auroras must be a must in your checklist for your landscape photography portfolio. Iceland or Norway has become a famous destination, but you will discover here some other interesting spots.
For sure, you saw thousands of amazing Northern Lights photographs on Facebook or Instagram before booking your trip. And if you are like us, those pictures convince you to travel to the Arctic Circle during winter to catch this with your camera. Even if you already know that temperatures can be cold and the weather can be against your goal… There is nothing that can stop your dreams!
But before booking a trip to see Northern Lights, you want to be sure that you can photograph them and get good results. Don’t worry! You arrive at the right place to learn, and we have a reply to all your questions.
But how to photograph Northern Lights if I’m a beginner?
This introduction to Northern Lights photography helps beginners who want to photograph Northern Lights. We will not explain the details so hard that it is easy to read and understand. By sharing the basic points you should know, you will be able to plan & photograph nice photos of Northern Lights. Even if you have a phone, here you will find a guide on how to photograph Northern Lights with your smartphone!
This post will help you to understand and increase your chances, avoiding the mistakes I made before. Also, it includes advice from all our team with experience photographing Northern Lights in Lofoten Islands, Yamal, and of course Iceland & Russian Lapland.
Best Camera Equipment for Northern Lights
Let’s talk about photo gear now. You can think that only with professional Nikon, Canon, or Sony cameras you will be successful. Don’t worry, continue reading and you will find the answer.
Do you need a special camera for the Northern Lights?
Just in advance, there is no perfect reply if you are looking for an exact model. Here are our camera equipment recommendations for aurora photography:
- A camera with manual mode functionality. Preferably a Full-frame DSLR.
- A good-quality tripod.
- Ideally a wide-angle lens with a fast aperture (f1.8, f2.8 or maximum f4).
- Batteries (In plural; batteries tend to run low in very cold conditions), and memory cards that work well in cold conditions.
Can You Photograph Auroras with an iPhone or Smartphone?
The reply a few years ago would have been no. Nowadays, smartphones have developed a great system so the answer is different. Yes, you can get aurora pictures with your phone.
With the latest Samsung or iPhone with the built-in Night Mode feature, you can capture Auroras. Smartphones like the Samsung Galaxy S20 or iPhone 11 Pro can help you in your task. Anyway, don’t expect the same results as with a professional camera. You will need brighter auroras to get good pics.
Consider buying a phone-tripod to capture auroras with your smartphone. As with a photographic camera, you will need that camera doesn’t move when the shutter is open.
Camera Settings for Northern Lights
Now that you know when, where, and what you need to photograph Northern Lights, let’s see how. Below, you will find some general camera settings to photograph Northern Lights. It will work in most situations but take it as a starting point for your session.
According to the brightness of the auroras, you could need more or less time. Also, the moon phase will play a role in the luminosity you have that night.
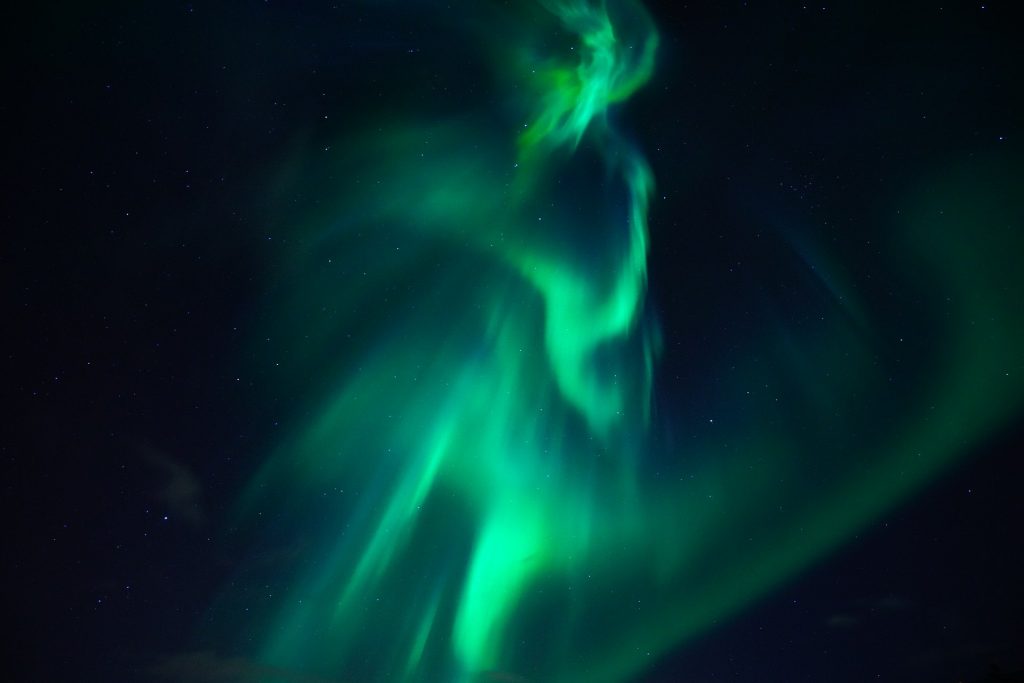
Check the settings of the image below. Look at the aperture and noise there. Also, check that is a composition of two pics with different shutter speeds.
Another point to consider is your camera. This way, we will speak at each point for the best possible settings, but also will give you tips to adapt to your camera. Let’s see!
Step by Step Guide
Our Northern Lights Photography settings guide focuses on beginner tips. With these camera settings for northern lights, you will be able to use your camera in Manual mode like a professional.
These easy steps must give you a reply to your doubts about settings. Anyway, if you have any doubts after reading it, write to us in the comments below.
Step 1: Set to Manual Mode
- Set both your camera & lens to Manual.
- Turn off Image Stabilization in your lens.
- Turn your Flash OFF.
During the day, the camera works well as it can measure what is around. But during the night you will need to use Manual mode. Cameras don’t see so well in the darkness! This way the Automatic setting is useless in Northern Lights conditions.
The zoom will turn crazy trying to find a point in the night. And with the flash, the same will happen, so turn it off. We will see in the next steps how you need to configure the settings.
TIP for beginners: All cameras (Canon, Nikon, Sony…) use M to set the manual mode.
Step 2: Use a Tripod
- Mount your camera on a tripod
Whether you use a photographic camera or your smartphone, you will need a trip. Hold your camera with your hands for more than 1 second (in the best case) not is going to work. Can be even windy, so try to get a good tripod to your trip. The minimum movement in your camera will result in a blurry image.
Another point before you put your tripod…think about the composition you are looking for.
Change your composition while Aurora is dancing! You will get different versions of the same place. Northern Lights change the shape constantly, so you need to be sure to capture all the swirls.
Step 3: Zoom & Focus
Continue the previous point, and according to your composition, you will need to zoom out as max as possible. Use the lowest mm setting on your lens.
Here are some tips to focus:
- Focus to the infinite: ∞
- In case you include the foreground, you need to calculate the hiperfocal.
It’s better to understand how your lens is focusing before the night. Some lens as the Nikon 14-24mm work better before the infinity option. Ideally, during the day you can find your focus. Then make a mark in your lens with tape as an example.
About zoom out, think that the Northern Lights will be in a big part of the sky. So as much you can capture, more impressive will be your Aurora photography. Choose the right scene and cover the full range of the Aurora.
Step 4: ISO setting
- ISO 1600 to start
For beginner photographers, we highly recommend you understand what is ISO in photography. ISO is the setting that controls the light sensitivity of your sensor. As a higher ISO you use, more light will be reflected in your photo. It can sound good, but this increase in light give us too noisy.
If you have a new camera model, ISO 1600 will work fine for Instagram purposes. But if you have an old model, maybe you will need to work with a lower ISO (800 or 400).
Did you use pre-digital cameras? So you will remember that before to control ISO, you needed to change your film. These days this function is just by pressing a button.
If you are looking to print your photos, try to use the lower possible ISO. It will reduce the noise of your photos!
Step 5: Aperture
- Set f-2.8
- Or the lowest f you can get
Use the lowest aperture or f-stop (f/1.8, f/2.8, f/4…) that your lens lets you. This setting is opening (or closing) your lens, letting the light entering through the lens to your sensor. As a minimum f-stop, as much light will enter on your camera.
The best setting for Northern Lights Photography to start is the lower possible aperture. As minimum shutter speed you will need to use, more detail you will capture the auroras.
On the contrary, you will need to keep everything on focus if you are composing with a foreground. In this case, you will need to take several pics. First for the Northern Lights, second with the foreground (and midground) in focus. You can use different settings for this last pic.
Step 6: Shutter speed
- Start with 20 sec.
The shutter speed is the exposure time of your photo. It means that is the time that your lens will be open and your sensor will be absorbing light. When the Aurora activity is not so high, you will need around 15-30 seconds. But if you are lucky to see a strong storm, you can decrease to 1-6 seconds.
Check your histogram as it will be showing you if you need more or less time.
Step 7: Remotely release the shutter
You have three options:
- Use a remote control
- Set your camera to 2 sec. self-timer
- Use an app
As we speak before with the tripod, the minimum movement of your photo will give you a blurry photo. This way, the use of remote control is basic here. Also, you can use a specific App to control your camera. Or at least set your self-timer to 2 seconds to avoid the click movement.
Even if you are shooting in RAW, another setting that you can adjust is the white balance. Set also to manual and Kelvin value to around 3,000.
Adapt to the situation
Check all our pics in this article, you will find the camera settings below. It can give help you understand that these values will be according to the conditions.
This article is focus to help amateur photographers to capture their first Northern Lights. Remember that your photos can not be perfect, and only practice will make you improve your technique.
But if you have the possibility to see it and photograph, it will be a once-in-a-lifetime experience. We hope that these simple tips help you to get your future photos!
With a high KP-Index, you even will be able to record videos of the Northern Lights. You will need to increase the ISO more than in photography, but it’s also possible.
Continue reading, and you will find more useful tips to be successful. Catch the Northern Lights with your camera is not only based on technical settings. It’s also based on your work on the field!
Practical Tips for Photographing Northern Lights
- Go outside. If you travel alone, don’t think that the Hotel staff will awake you to see it. Go outside and look for auroras following our tips. If you travel on a photography workshop, probably you can avoid as your tour guide can do the job for you.
- Have your photo gear ready. Probably, during winter you will come to your hotel early after sunset. During dinner is a good moment to charge your batteries. You not will want to go out during the night and miss the opportunity. Also, if you have a chance to set up your camera before, it will help you to not get nervous when they appear.
- If you are traveling by car, move to a good landscape location. Your photos will look so much better if you also show a beautiful waterfall, lake, or forest. Consider also to scout beautiful nature spots around you during the day, so at night it can be easy to arrive.
What to Pack for Aurora Hunting
- Camera equipment.
- Warm clothing. You will spend a few hours during the night in the Arctic circle, so be sure you have the right clothes. We not speak only about the jacket and hat. You also will need good thermal underwear to keep warm.
- Gloves. Nothing can be worse that can’t move your hands to set your camera. Warm your hands with good photography gloves for winter. So you can keep on photographing Northern Lights. Consider hand warmers as well. Subscribe to our newsletter and you can get some nice equipment from Vallerret with a discount, and also get our news.
- Warm shoes. Another place of your body that you must keep warm. Get good and insulated winter boots and warm shocks. It’s important to have fun and don’t think about the weather.
- Thermos. I didn’t appreciate hot tea during winter till I come to Russia. I keep good the cold temperatures, but a hot drink at night will help you to warm.
- Headlamp or a flashlight. This is probably the most useful photographic accessory you can bring. It will help you to set your camera and also walk during the night. Or you are thinking to go by dog sledding?
- Snacks. As you will probably spend hours outside, it’s good to bring with you something to eat.
What is the Northern Lights
The Northern Lights is an astronomical phenomenon called Polar Lights (Aurora Polaris). The Auroras are lines or curtains of colored light visible sometimes during the night at the sky.
This light is produced by the collision of electrically charged particles from the sun. At the moment that enters the earth’s atmosphere, it produces this visible light. These particles create a huge ring above the Earth’s Geomagnetic North Pole which is known as the Auroral Oval.
How to See the Northern Lights
First, we need to know when you can see Northern Lights. If you are not able to see, it’s impossible to photograph no? It looks stupid, but understand when you can see it’s as important and how to photograph.
There are 4 factors to see Northern Lights: Location (and season), Darkness, Clear Sky & Aurora activity. But of course, persistence and luck is another factor to consider.
Let’s understand better all these factors with the details below. You will find practical information, such as forecast Apps & websites. Let’s start!
Where to see the Northern Lights
The best places to watch Northern Lights on the planet are Iceland, Norway, Finland, Russia, Alaska, and Canada. As a Spanish living in Russia, it’s incredible for me how all internet articles forget about the biggest country to see Northern Lights.
The Northern Hemisphere as you can see in the planet map below, include all the countries. As to see the Aurora Australis is more complicated due to the location, we can’t include any country in the list.
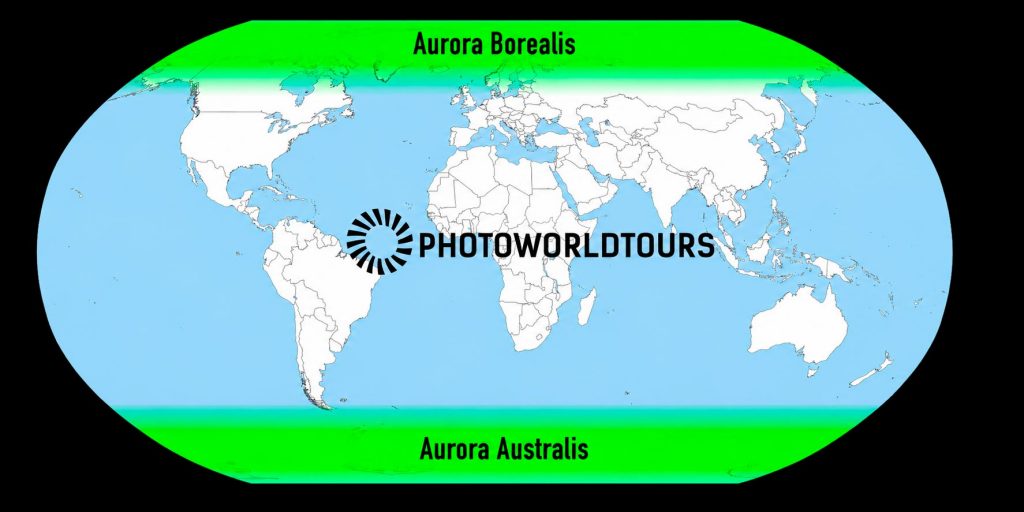
As deeper you come to the Aurora ring, the more chances you will have to see it. Of course, the size of the ring depends on Aurora’s activity (Kp-index). This way as more close to the North you are, the more possibilities you will have.
According to this point, all Lapland is the absolute best place to see auroras in the world. It includes the Russian Lapland, Tromso and Lofoten Island (Norway), and Finnish Lapland. As we explained before, according to the website you visit (and the tours they sell) you will find only one of these locations mention.
When to see the Northern Lights
The best season to see Northern Lights depends on the location. But you have the best chances of seeing auroras from September to March, give or take a few weeks. We didn’t mention but as you can imagine it’s impossible to see auroras during summer.
January can be freezing and bad weather. This way, we prefer to travel in February or March to capture the real winter. Or November and even October if we look for better conditions on the road.
During Christmas (December and January) also the hotels became more expensive in Europe. So even if it’s a good moment to see Northern Lights, you can save some money in your hotel traveling outside these dates.
Conditions to see the Northern Lights
Dark Sky
As with all astrophotography, you know that you can’t see auroras during the day. But also during summers when the sun at the Arctic doesn’t hide on the horizon. Then, as you can imagine the skies don’t become fully dark. To be able to see Northern Lights you will need darkness.
It does not need to be a problem in the North during winter (From January to March). As nights are long, it increases the possibilities to see Northern Lights.
Clear Sky
We start now with factors that you can’t choose. To see Northern Lights you will need a clear sky. A cloudy day can hide all night the auroras, so sometimes its a question of luck to see auroras. You can check the weather to predict if it’s a good night to catch, but some small clouds can ruin your success.
As I explained before, I travel to the Russian Lapland some time ago but I was not successful to photograph Northern Lights. I thought that with 3 nights there, I will be able to see… The truth is that I saw it, but to take a good photo was impossible.
Anyway, if you travel to the North in order to see Northern Lights, you must go out every night. Even if the aurora activity is low (Kp-index 1-3), but sky clear, you can be lucky to see it.
Also, if there is a cloud, can be a moment that opens and there will be your chance. So our tip, is that if you travel far to see Northern Lights, don’t stay at your hotel. Every night you must try to see it!
Aurora Activity
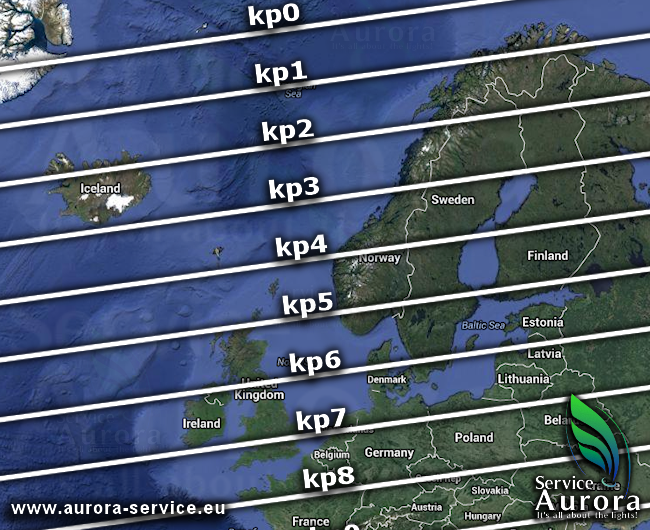
We talked before about the aurora activity and the oval, but we didn’t explain it. The Aurora activity is measured on the scale KP-Index from KP0 to KP9. 0 means no expectations, and 9 it’s an intense storm that rarely happens.
To be successful usually with 2 or 3 you can catch some nice auroras in a good location. As much high is the KP, more low in the latitude can be visible, and much more strong will be the lights.
If you never saw Northern Lights before, can be difficult to distinguish vague auroras from the clouds. To be sure, take a picture and check the colors. If it’s green you are watching your first Northern Lights.
At this moment, don’t desperate to take the best pictures. Once that you see activity in the skies, it means that it can increase even in a minute. As we say before, there are factors that depend on luck and it’s one of them. Forecasts can say that there is high activity and don’t see it. But also the opposite, so even if the forecast gives you a small activity, go out and look with your own eyes!
What is the best App for Northern Lights?
One of the best apps for photographers that are looking to photograph Northern Lights is My Aurora Forecast. It has almost all you need, from a map to notifications when the activity increases.
Another website we can suggest is this website if you are going to visit Iceland. For Norway’s trips, another website that works great is Aurora-Service. Finally, spaceweatherlive will give you more general information all around the world.
These websites and apps that can be helpful to know the forecast. But as you can imagine, these websites and Apps are not so accurate according to the different regions you visit. The best tip is to ask the locals what they used to know about the Aurora Forecast.
Remember to look also at the weather forecast and radar information. Sometimes you can have a high activity close to your location. Or as can happen more often, close to your hotel can be cloudy, but just driving 30 minutes you will find clear skies.
See also our related articles to learn night photography.
Contact us if you are interested in extending this guide to a free download e-book. We will be glad to share it with you.