Rule of thirds in Photography
If you didn’t hear about the rule of thirds in photography, you are lucky to arrive here 😉 Technical settings of your camera are not enough to get good photos. Of course, it’s important to know how to set up your camera but when you start with photography you could forget that photography is something more than a technical thing.
There is a famous phrase in photography, that not is the camera that makes the photo, it’s the photographer. It can sound like a camera it’s not important, but yes… the camera it’s one of the main, the phrase just tells you that it is more important your point of view than the camera. And here is where appear the composition of your images and how the eye sees a scene.
What is the Rule of Thirds?
The Rule of Thirds is the basic compositional rule that divides the image into thirds. So the main subject of the photo is placed at the intersection of these lines.
All photographers should learn it in the process of starting into photography. It has a sense, it’s easy and help you to improve your compositions that after practice a little with this, you will follow these rules even without thinking. Also, and even more important, you will know when to break this rule to improve even more your photos.
First of all, take these rules as guidelines and techniques that will help you in taking better photographs.
Composition with the Rule of Thirds
The basic of it is simple. Divide your image into proportional thirds, horizontal and vertical, so you will get 9 frames in your images. These lines will tell you where you should compose the lines of the scene in your pic.
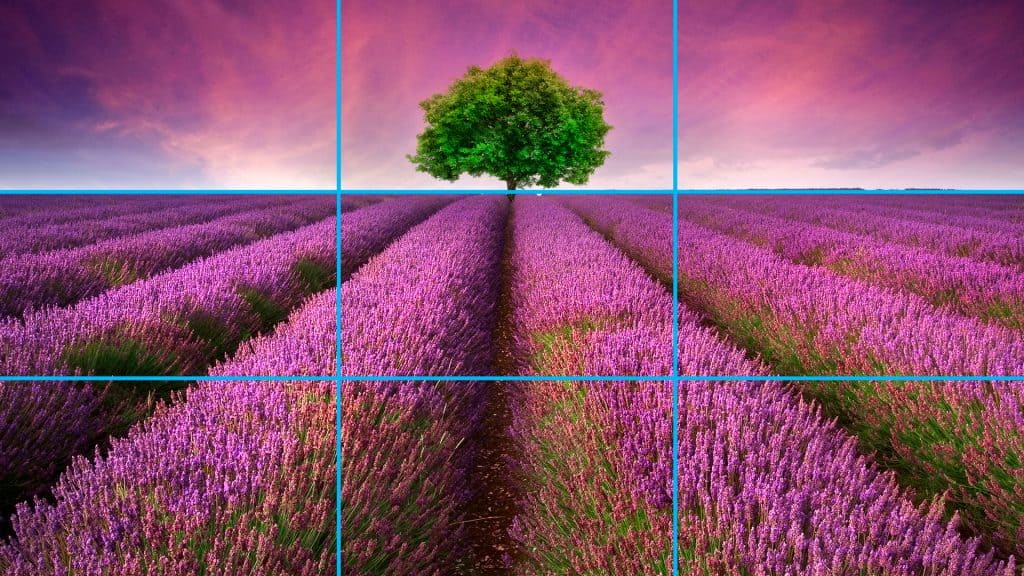
A basic example, is the horizon in landscape photography. When you are in front of a landscape, usually people compose with the horizon in the center. Instead of this, if you put in one of the two horizontal lines of the thirds, your photo will automatically focus on what you want to show.

In this photo taken during a Provence Photo Tour, the view is of the lavender field, and from it you guide the view to the horizon to the tree and sky. If you place the horizon in the center, the eye will not have a place where to look natural, so if you wanted to show the incredible sky, the horizon should be placed in the lower horizontal line.
These lines can change the way you look at an image, so choose first what is the main of your photo before thinking about composition. Once you look through the camera, you can use the grid view in most cameras (Live View or Viewfinder). Check the manual of your camera to know better where to find this option.
Examples of Rule of Thirds in Photography
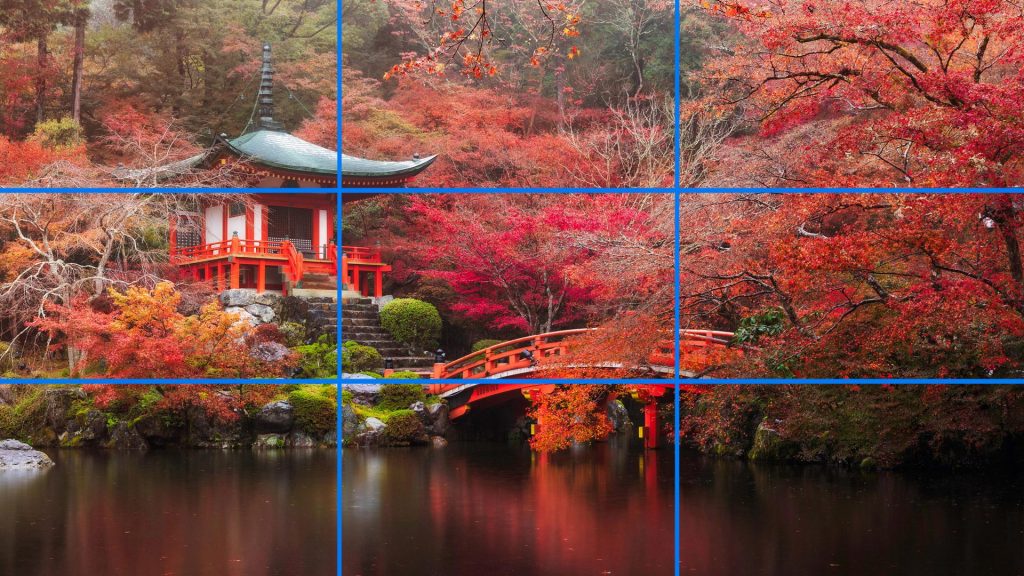
Let’s look an image to understand:

In this case, you can see that the temple is positioned in the left vertical line, also the bridge and lake are located at the bottom horizontal line. Another interesting point is that the bridge starts at the point that the bottom horizontal line, merges with the right vertical line.
These points are the stronger of our compositions and help the eye to focus on the areas of the image we want to show.

In this example, we can start looking at the bridge, and automatically our vision will go around the bridge till the temple, with all the forest around that, will bring our eyes again to the bridge.
Let’s look some images to make them more visual and easier to understand:


In the first example, this photo taken during an Iceland Photo Tour, you can see that the horizon is located in the first horizontal third, and the photographer at a strong point. This way, we follow our view through the valley to the mountains.
In the second & third example, you can check examples where landscape it’s not the main, but the rule of thirds is a main to get great pics. Usually, in portraits, the eye must be positioned in one of these strong points, where vertical and horizontal lines merge, so our photos will be richer than if we place them in the center.
Should You Always Follow it?
As a genius say: break the rules once you know! The rule of thirds will help you to improve your photography, to get perfect compositions, and focus your photography on the subject you want to photograph.
But there are situations that you just broke it to get the result you want. The horizon sometimes will be better to locate close to the border of the frame, a portrait in the center can help to focus on the face or much more examples as your creativity can imagine.

So once you’ve learned (and understood) the Rule of Thirds, don’t turn crazy about that. The best to get good images, it’s practice and looks as much as you can from photographers that inspire you.
Then you will pay attention to how they use (or not) these rules, and you will know how to do the photos you liked before know about this golden rule of photography. Also in the cinema or another visual art is used, so train your eye and enjoy photography and your trips.
In our workshops & photo tours, we focus on locations in the best hours, but also about composition, so you can be learning and training your eye in the field. Enjoy while you travel, but also learn every day from professionals.
We also recommend reading our post about editing photos in Photoshop and Chromatic Aberration to continue learning Photography. Also, on youtube, you can find visual videos that will help you to understand better the rule of thirds.


I like the helpful info you provide in your articles.
I’ll bookmark your blog and check again here frequently.
I am quite sure I will learn many new stuff right here! Good luck for the
next!
Thanks a lot, we are glad our blog helps you.
Way cool! Some very valid points! I appreciate
you writing this write-up and also the rest of the site is also very good.